Future Pipe Makers:
Pipe kits are designed to alleviate the need
to have
a large shop full of tools . All that's left for you to do is carve.
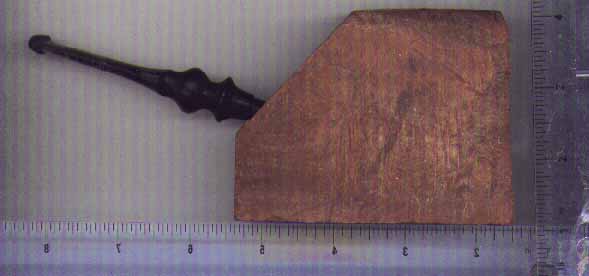
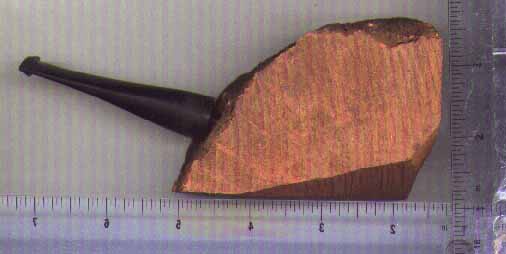
The
kit contains a briar block that has the tobacco chamber, the air hole
and
the tenon holes drilled and meeting at their proper locations. As you
are
making a custom pipe, many decisions have to be made before we drill
the
block. They are:
	These considerations do not effect the cost of the kit and
 are design options that you can choose to make or not.
Ebauchon blocks are used in the manufacture of machine made
pipes.
They are generally cut perpendicular to the axis of the straight grain
rendering
them cross grains with birdseye. They tend to have more inherent flaws
than
plateaux briar. They are good for a small to medium pipe. This would be
my recommendation for a first pipe.
Plateaux Briar, as the name suggests, is the top part of the
burl.
It has a rough pebble top that can be left on for a freehand look or
sanded
smooth for a traditional appearance. Plateaux comes in different shapes
and sizes. we will do the best we can to match your design to the
proper
block. Plateaux grain tends to run straight or angled. These blocks
will
generally yield flame grains or an occasional straight grain. They
contain
generally less flaws than ebauchon , though you don't know what a block
will yield until you get into it.
PICTURES OF THE KITS:
Pictures displayed are all bents but they are the same size blocks that would be used for straights in the same category. Also size of kit is irregardless of stem choice.Please note that briar varies quiite a bit,block to block, especially in plateaux, so these are examples only. The ebauchon sizes do not vary as much.
Plateaux kits follow these guidelines.
PK5,6,7&8 consist of blocks that weigh between six and eight ounces.
PK9,10,11,&12 consist of blocks that weigh between eight and twelve ounces.

The basic price of a kit is $23.00.
(This includes a drilled ebauchon block and a vulcanite stem.)
An acrylic stem costs $3.00 extra.
A medium plateaux block costs $5.00 extra .
A large plateaux block is $8.00 extra.
Shipping cost is $5.00
As each kit is made individually it may take 1-2 weeks before we can
ship
them.
To Purchase:
ENTER THE AMERICAN PRODUCTS STORE
American Smoking Pipe Co(Excerpted from The
Ohio Pipe Club Journal with permission from the author. Comments
in
italics were made by Mark Tinsky either for purposes of clarification
or
additional advice)
When he learned that I had created a handful of briar pipes during
the
last couple of months, Bill Unger(of Ohio Pipe Club) asked me to
render my experiences and any hints developed while making pipes for
the
education and enlightenment of the membership. Being even more of an
amateur
at writing than I am at pipe making, I must beg for your forbearance as
you read on.
I have been a pipe smoker and in a small way a collector for the last
40
years or so. During that time, I frequently wondered while I admired or
smoked some pipe maker's masterpiece if such creativity was in the
realm
of possibility for the average bloke (read "me"). The answer was,
for a long time, no way, man! Last Christmas, however, Harold Berlin,
my
best buddy of some 30 years standing and also a pipe smoker, threw me a
real curve. Over the years, he and I had frequently discussed the
various
attributes that go into making a pipe a success, both artistically and
as
a good smoke, and had wondered together if we could make a pipe of
professional
quality given the materials and the time. His method of bringing the
matter
to a head was to present me with a briar block and a stem blank as a
Christmas
gift along with a challenge to get off the dime and make a pipe.
I headed for the shop to see what I could come up with. To make a long
story
short, after about 12 hours of work, I held in my hands my first pipe,
a
Danish-style freehand with plateau (that is, the rough, naturally
knobby
surface of the briar) bowl top and stem end similar in shape and style
to
various Ben Wades and Preben Holms that are among the favorites of my
small
collection. I'm sure I was guided, albeit unknowingly, in shaping that
first
pipe by some of the attributes I had admired while handling and smoking
the pipes of the Danish masters. Bursting with pride, I rushed to show
my
creation to Hal. He was stunned! Well, I want you to know that this
initial
success created a monster. I rushed an order to a supply of briar
blocks
and assorted stem blanks and haven't looked back since. The thing that
really
amazed me and continues to do so is that making pipes really isn't all
that
difficult. All one needs are a few basic tools, the pipe materials and
a
plan of action. Basic Tools I'll describe a minimum tool set and then
mention
a few special tools that might make the job easier or more pleasurable.
But one can get by easily with a vise, a square, a small saw (coping
saw
or hacksaw), assorted files, assorted sandpaper and an electric hand
drill
with assorted bits. Additional tools, such as a special drill bit for
boring
the tobacco hole, a tenon turning tool, buffs and cutters, are
available
at a cost that will fit into most people's budget without breaking the
bank.
I am fortunate to have a small Shop smith combination lathe, a bench
grinder,
a bench motor with tapered spindles for wire and buffing wheels and,
most
useful of all, a Foredom flex-shaft hobby tool with a large assortment
of
cutting, grinding and polishing accessories. I use these tools because
I
have them in the shop, but one could easily get by with the basic list.
As my pipe-making experience is limited to a handful of briar pipes,
predominantly freehands, I'll stick to briar in outlining the materials
necessary. Basically, two materials--briar and stem stock--are needed
to
construct a pipe. These, however, are available in many different forms
and qualities. Most experts advise beginners to start with an ebauchon
for
their initial few forays into pipe making because ebauchons are
typically
cut in a size and shape to facilitate making a pipe, and being from the
inner, less desirable part of the burl, they are cheaper. Here is where
I differ from the accepted philosophy. I use only extra-grade plateaux.
They cost a few dollars more but are vastly more likely to yield a pipe
with beautiful grain and excellent smoking characteristics. My thinking
is that if I'm going to spend 8 to 12 hours creating a pipe, why start
with
a $5-6 ebauchon, when, for $12 or $14, I can start with an extra- grade
plateau that will maximize my possibilities for creating a truly nice
pipe?
Enough about wood; let's talk stem materials. Most briar pipe stems are
composed of vulcanite (hard rubber, also occasionally referred to as
ebonite
or vulcanite) or acrylic. Acrylic is referred to by several proprietary
names. The most common is Dupont's Lucite, but also encountered are
Perspex
by Imperial Chemical Industries, Plexiglass by Rohm & Haas and
Acrylite
by American Cyanamid. Both vulcanite and acrylic are available in rods
of
varying diameters from which the craftsman can produce pipe stems of
any
desired shape and size. Doing so requires a lathe or drilling jig
because
the stems must be drilled, shaped, sanded and polished. The beginner is
probably better served by purchasing pre-shaped vulcanite stem blanks
made
in presses that only require final shaping, sanding, bending (if
desired)
and polishing. They are available in a wide variety of styles and sizes
both for standard shaped pipes and freehands.
Before actually starting to form your pipe from the briar plateau, I
advise you to prepare a plan of action, which will be controlled to a
large
degree by the size, shape and grain characteristics of the particular
block
you are working with. In order to get a good idea of what lies within
the
bark-covered, rough-sawn plateau, I recommend first cleaning it up a
bit.
The outer surface's bark covering can be readily removed by vigorously
applying
a wire brush or a wire wheel on a drill or bench motor. I've used both
methods
and recommend the mechanical version if you have the equipment as being
much quicker and less difficult. One must wear eye protection because
the
bark and small bits of wire are shed from the wheel with projectile
force.
I wear a full-face shield while engaging in this process, and I
frequently
hear the resounding "ping" of some errant bit of wire bouncing
from the shield. Much better than finding it stuck in my face! Have no
fear
that the wire wheel will deface the plateau surface, leaving it
unsuited
for use as a handsome knobby pipe top or stem end. The briar is tough
enough
that only the bark is removed, leaving a clean plateau surface.
The next step in preparing a block is to sand the outer surfaces, which
have been rough sawn to a smooth surface that reveals the grain
pattern.
When the plateau is sawed, the sides and bottom are normally kept
square
with one another. When you sand, be sure to retain this squareness. It
will
allow you to plan the drilling of the tobacco and smoke holes precisely
so that they meet at the proper place within the block. Once your
plateau
is clean, I suggest that you wipe it with alcohol,(or water)
which
will cause the grain to stand out momentarily and will give you a
realistic
picture of what you may expect to find as you begin carving. I find it
helpful
at this point to roughly sketch with a soft lead pencil various
potential
designs for my pipe on the side of the block. The marks are easily
erased,
and one may proceed until a design is reached that seems to fit within
the
available wood and that makes the best use of the grain pattern.
Another
advantage of cleaning up the blocks and doing this preliminary
sketching
is that you can frequently figure out ways to come up with a nice-
looking
pipe while cutting away parts of the block that display obvious flaws.
At this point, perhaps a few words about flaws in the briar are in
order.
You will seldom if ever find a piece of briar burl completely free of
flaws,
which may appear as cracks, sand pits or small pockets of foreign
matter
and may be found on the visible surface of the block or hidden deep
within.
Although most flaws, if left visible on the outer surface of your
finished
pipe, will not affect the smoking quality, one usually strives, simply
from
a desire for beauty, to achieve a finished product that displays no
flaws.
I must admit, however, that strive as one may, achieving a finished
product
absolutely free of visible flaws is seldom possible. Even the most
advanced
professional pipe makers may find a pit or crack just as they are doing
the final sanding on a hitherto flawless masterpiece. In this case, one
must accept the flaw, remove it and use a fill or continue removing
wood
in the hope that the flaw is shallow enough to be sanded away without
spoiling
the pipe's shape. Another method frequently used by professionals when
something
like this rears its ugly head is to revert to a sandblasted or
otherwise
textured finish in order to hide the flaw(s). While I personally admit
to
liking a well-done sandblast finish, I prefer a beautifully grained
smooth
finish, and I find myself striving toward that end in my own pipe
making.
I have made a pact with myself to never use a fill to hide a flaw in
one
of my own pipes. If I am unable to remove the flaw by further sanding
or
by using a strategically located depression (as is frequently done by
the
Danish masters), I'll consider sandblasting the pipe (I have the
equipment
but haven't actually attempted it yet), or else I'll leave the flaw
visible.
If the flaw is sufficiently disfiguring as to make the pipe
unsatisfactory
for my own use, I reluctantly discard it and start afresh with another
block.
Having sketched an outline of your planned pipe on the side of the
block,
the next step is to draw an outline of the tobacco hole and the smoke
hole.
It's a good idea, if possible, to center the tobacco hole in the
planned
bowl and to place the smoke hole so that it meets the bottom of the
tobacco
hole while still running down the center of the planned shank. In the
case
of certain designs with bent shanks, the placement of the smoke hole
must,
perforce, come close to the top of the shank at one point in its
length.
In such cases it's important to plan the design and shaping so that one
doesn't cut into the top of the smoke hole while shaping the shank.
Certain
designs may be best achieved by first drilling the larger hole for the
mortise
(that portion of the shank into which the tenon of the stem fits) to
its
proper depth of 5/8 to 1 inch in the center of the planned shank. Next
drill
the smoke hole itself, offset somewhat in the bottom of the mortise so
as
to facilitate meeting the bottom center of the tobacco hole more
easily.
Once your drilling plan is sketched on the side of the block, it is
time
to begin actually making your pipe.
The first step in actually making your pipe is drilling the smoke
hole
and mortise and the tobacco hole. A drill press is your best bet. I am
fortunate
to have a Shop smith lathe (wood lathe) in the shop and find
that,
with the proper setup, I prefer using this handy tool. The key to
success
when using one tool or the other, however, lies in accurately measuring
the angles and depths of the holes you're going to be drilling as
related
to the square outer surface of the briar block. I first drill the smoke
hole and mortise and then the tobacco hole. If the depth and angle of
the
smoke hole are accurately controlled, meeting the tobacco hole exactly
in
the center of the bottom is simply a matter of carefully drilling the
tobacco
hole while frequently pulling the bit out as you near the planned depth
to visually check the bottom of the hole. When the smoke hole becomes
visible,
carefully proceed, using a light touch with the drill, until the
relationship
of the holes with one another is optimal.
For drilling the tobacco hole, I highly recommend the special bits sold
by Stemco-Pimo; they will produce a hole of the proper size with the
proper
rounded bottom contour. A set of three bits in sizes appropriate for
most
pipes costs about $16. You could, of course, make your own bits by
shaping
commercial spade wood bits to the proper contour on a grinder. Another
possibility
that I have considered but not yet tried is to use contoured milling
burrs
of the proper shape and size, which I have seen in tool supply
catalogs.
These are designed to mill holes in metal and would undoubtedly work
equally
well in briar burl and would perhaps leave an even smoother inner
surface
to the tobacco hole than a wood bit does. Sanding the interior of the
tobacco
hole on a finished pipe is rather difficult because of its limited size
and rather deep contour, so any help in tarea would be most welcome.
When the drilling is finished, you are ready to begin shaping your pipe
to its finished contours. Briar burl is a very hard wood, and you will
quickly
find that removing large quantities of stock with a coping saw or
hacksaw
by first cutting off corners and other portions of the plateau that
fall
outside the lines of the finished pipe will save you much time and
effort.
(Save these pieces!) Be sure to leave sufficient stock for small
changes
in shape to allow for removal of interior flaws that might be uncovered
in the sawing.(Access to a band saw is quite helpful)
You may choose among several tools to actually shape the pipe.
Experienced
wood carvers might prefer a knife. However, I believe that the hardness
of the material makes files more appropriate. Even better is a hobby
tool
such as a Foredom flex-shaft or even a Dremel tool if you have one
available.
I am fortunate to have a Foredom flex-shaft tool and a selection of
cutting,
grinding and drilling bits available in the shop. I use this tool
almost
exclusively to shape my pipes once I have removed the excess wood by
sawing.
The most useful bit I have found and the one I use about 95% of the
time
is a 1/2" sanding drum equipped with the coarsest abrasive available
(80 or 100 grit). With this tool, I shape the stummel (that part of the
pipe comprising the bowl and shank) from start to approximate final
shape.
It removes material quite rapidly, and you should practice with it in
order
to insure that you don't inadvertently take off too much in any one
spot.
With a bit of practice, you can use it almost instinctually, and it
allows
you to shape the hard burl with amazing ease. When you use this tool, I
recommend that you wear a disposable paper filter mask to prevent the
fine
briar dust from clogging your nasal passages. Eye protection is also
mandatory.
When you have achieved a shape that satisfies you, the sanding process
begins.
The object here is to refine the shape to its final lines and to remove
as many flaws as possible (hopefully, all of them) from the visible
surface
while arriving at a stummel that is ready for staining and/or waxing. I
begin the sanding process with 100 grit paper, using hand sanding or
wrapping
the paper around an appropriately shaped item, such as a drill bit, a
pencil
or my finger, to get at the curved places. Once I have completely
sanded
the stummel with the 100 grit paper, I progress to 150 grit, then 220
grit
and on through 400 grit to final sanding with 600 grit paper. This
process
sounds fast in the telling, but it actually consumes more time than the
actual shaping of the stummel with the Foredom tool.
The satisfaction you or anyone will feel from handling and using your
finished
pipe is largely derived from the perfection of its finish, so any
amount
of time spent to achieve perfection here is time well spent. When the
sanding
is completed to my satisfaction, I next wipe the entire stummel down
with
alcohol on a soft cloth. Wiping serves to remove sanding dust and to
expose
any flaws that the dust may have hidden or any scratches left by the
final
sanding. Almost invariably when I carefully examine the stummel, I find
some tiny spot that I didn't sand quite thoroughly or some tiny flaw
that
I think could be removed by further sanding. This, mind you, after I
was
virtually certain that I had done a perfect job in the first place! I
have
been known to revert to the 220 grit or the 400 grit level as many as
three
times on a single stummel before finally arriving at what I consider an
acceptably sanded end product. I don't know if my oversights are caused
by poor eyesight on my part or being in a rush to get the sanding done
or
if they are a normal occurrence, but I really hope to get better at
this
part of the game with practice.
The final step in preparing your stummel for use is to apply a
stain--if
you want to--and a through waxing. Many pipes will be enhanced by a
stain
that brings out the grain or simply changes the color of the unfinished
wood to something more in keeping with the maker's aesthetic feelings.
Pipe
makers use alcohol- based stains that are available in a myriad of hues
and shades. I prefer a briar pipe to look like it's made of wood rather
than some brightly colored substitute material, so I tend to stick to a
natural finish if the grain is up to it or a light walnut or cherry
finish
if the grain needs the help. You can stain the small pieces of wood
removed
with your saw when you first began to shape the pipe to determine which
color works best with this particular piece of wood. I apply the stain
with
a Q-Tip, being careful not to allow it to run down inside the bowl.
When
the stummel is dry after a minute or so, I burnish it with a piece of
0000
steel wool to remove excess stain and to lighten the stained surface to
the desired shade. If the pipe is a plateau-topped freehand, you may
wish
to use a darker stain or even a black stain on the plateau surface. If
you
do, take special care to prevent the dark stain from running down the
outside
of the bowl. I prefer to use the same color stain that I plan to use on
the sides of the bowl but to just apply it more heavily on the plateau
top.
Then I'll usually lighten the bowl color to some degree during my steel
wool burnishing, thus giving a nice contrast between the top and sides
of
a plateau-style bow.
Having stained your bowl to a satisfactory color, you're ready to apply
the wax. I recommend pure carnuba wax, which is used by most, if not
all,
professional pipe makers and gives the hardest, longest-lasting finish
of
any wax. It is so hard that it cannot be applied by wiping on like most
other waxes. Carnuba must be applied by holding a chunk of the wax
against
a spinning cloth buffing wheel to charge the buff and then using the
charged
buff to apply the wax to the pipe. With care, this waxing procedure
will
result in an extremely hard glasslike polish on the pipe that cannot be
achieved with any other wax. Other waxes are available that will do an
acceptable
if less satisfactory job, but I recommend pure carnuba.
I have left for last the subject of fitting your pipe with a stem so
that you can actually smoke it. Because I have concentrated primarily
on
Danish-style freehands in my pipe making thus far, I can leave making
the
stem until last. If, however, you have decided to make a standard shape
for your first effort, shaping the stem must be integrated into shaping
the shank of the stummel. With standard shapes, the stem is exactly the
same diameter and shape as the shank and must therefore be shaped
together
with the shank to get a smooth junction. In the few standard shapes I
have
made thus far, I haven't found this difference to cause any particular
problem.
I tend to simply place the stem in the stummel once I have turned the
tenon
down to the proper diameter and then to shape the stem and shank as if
they
were a single piece of material. A freehand pipe, on the other hand,
seldom
uses a stem that is formed as a continuation of the shank. In most
freehands,
the stem is a fancier shape, with symmetrical grooves and/or bulges,
and
it may be conveniently shaped and sanded apart from the stummel one the
tenon is turned to the correct diameter. Stemco-Pimo offers a clever
tool
designed to be used with a hand drill to turn tenons to size.( As
does
JH Lowe and Joe Giardino) I haven't used this tool because I have
devised
a method of doing the job using the Shop smith, but if you don't have a
lathe, it appears to be quite adequate for the job. Needless to say,
the
tenon must be turned to precisely the diameter of the mortise to ensure
a snug fit when the pipe is assembled.
Once you have shaped your stem to the desired contour and sanded it to
a
smooth finish using only the finer grits of paper (320, 400 and 600),
it
is time to bend it to its proper curve to enhance the pipe for which it
is intended (unless of course it is to be left perfectly straight).
Vulcanite
stems, which comprise the majority of stems in the pipes I have made
thus
far, may be bent quite simply with materials at hand in every home.
First
run a pipe cleaner through the stem so that it protrudes from both
ends.
Bend the ends to 90 degrees more or less from the line of the stem. Put
the stem and pipe cleaner in a small oven-proof container and cover it
with
a layer of table salt. Place the container in your kitchen oven set to
a
temperature of 270 degrees F for 10 or 15 minutes or until the stem
gets
soft enough to bend easily. Remove the stem from the salt by grabbing
the
exposed pipe cleaner. Using a folded handkerchief or other cloth to
prevent
scorching your fingers, bend the stem to the desired degree. Hold the
bend
in place with your hands and the cloth until the stem has cooled (or
dip
in water while maintaining bend for 10 seconds) sufficiently to
retain its shape unaided (only a minute or so). Remove the pipe cleaner
and try the stem in the pipe to see if you like the looks of your job
or
if you want to add or subtract from the bend or to make a slightly
different
arc. Return the pipe cleaner and heat and bend again as desired.(This
may
also be accomplished by rapidly moving stem back and forth over a flame
such as a torch or alcohol lamp. Keep the stem moving so it doesn't
scorch)
Once you're satisfied with the bend, you may proceed to the final
finishing
of the stem, which is accomplished by burnishing with 0000 steel wool
and
polishing on a motor-driven buffing wheel charged with tripoli. You
may,
of course, use your electric hand drill to turn the buff, using the jig
you built earlier to hold the drill. Assemble your stem and stummel and
gaze in awe at what your hands have wrought. I'm certain that you'll be
pleased with it and that it will hold a special pride of place in your
pipe
rack henceforth.
In the initial smoking of my hand-crafted pipes, I have followed
standard
recommendations for loading and breaking in. I do not stain or
otherwise
finish the interior of the bowls of my pipes other than by sanding to
remove
the drill marks. The bare wood may be coated with a thin coating of
honey
for the first smoke if that is your normal method of breaking in a new
pipe.
I find that my pipes, being made from the finest of plateau briar
available
to me, break in and smoke much as any fine Danish freehand might be
expected
to respond. I start with a half-bowl of tobacco for the initial few
smokes
and quickly progress to a full bowl after two or three bowls. Thus far,
I have determined that if the geometry of the smoke hole versus the
tobacco
hole is correct, one may expect a sweet, cool smoke right from the
first
puff and that it only improves as the pipe breaks in. I attribute this
to
the use of high-quality plateaux as raw material and care in the
planning
and drilling of the tobacco and smoke holes.
In preparing this description of one amateur's methods of pipe
making,
I have borrowed heavily from what I learned by reading Pimo's Guide to
Pipe-crafting
at Home.
I hope that reading my description may cause some of you who may have
been
wondering if pipe making was something within your reach to believe
that
it really is. I doubted for years that I possessed the ability to make
a
decent pipe "from scratch." In so doubting, I cheated myself out
of an awful lot of fun as well as who knows how many pipes. --Smoke in
Peace,
Bob